Headshot: Game Hacking on macOS
This post will cover the method I approached to do some rudimentary reverse engineering and wrote a console based game trainer for an open source FPS game called Assault Cube. Continuing with the spirit of game hacking from my last post which covered my approach for hacking an iOS game using various tools and techniques, I’ll discuss the requisites and tools which aided me in this endeavour. All the source code used in this post is present in this GitHub repo including the final trainer implementations: headshot

My inital aim was to develop a subset of the common and popular features which are usually associated with a game trainer such an infinite health and ammuntion, and some of the more exotic features including an aimbot (automatic aiming at enemies) and ESP (extra sensory perception - just a fancy term for being able to see enemies through walls).
While there are a lot of tutorials for developing game trainers for Windows based games online, the resources for doing the same on macOS are fairly scarce and are mostly present in undocumented code repositiories on GitHub. Since I was unable to find a step-by-step approach for doing this on macOS, I decided to take up this task for fun and this eventually turned into a conference talk as well which I gave at BSides Delhi 2018. The slides for the presentation can be viewed here.
Before I get started with the technicalities, I would like to mention the resources which were extremely helpful for me to approach this problem:
-
Guided Hacking - this is a forum which discusses the development of cheats for a plethora of games and has an active forum and extremly helpful community. I learned about all the model-view matrix calculations which I talk about later in this post, from this website.
-
Frida - this is a dynamic binary instrumentation tool which supports various OSes and architectures. It is an extremely powerful and easy to use. I had also mentioned this tool in my last post.
-
mach_inject - this is a tool for dylib injection on macOS. This proved to be an pragmatic resource detailing the usage of the
mach_vm_*API which is essential for interacting with another process on macOS. -
OpenGL rendering pipeline - this gives a detailed overview of the rendering pipeline used by OpenGL. This was an invaluable resource while developing the ESP hack,
Now lets begin with the actual details.
This article is roughly divided into the following sections:
- Finding the needle in the haystack
- Finding Player offsets
- Native memory read-write
- Aimbot
- Finding enemies in our FOV
- Seeing through walls!
- Wrapping up
Finding the needle in the haystack
So first we’ll start with the easy stuff, how do we get unlimited ammo and armour and health? We need to figure out how the game stores these values and how we can control them. So we can assume that there are some properties which hold for all player entities in the game. Every player has a health value which decreases when you’re inflicted with damage when another player shoots at you. There are also variable which hold the count of your bullets in your current magazine along with a variable which holds the number of magazines your player has. These could possibly be stored as members of a Player class.
class playerstate
{
public:
    int health, armour;
    int primary, nextprimary;
    int gunselect;
    bool akimbo;
    int ammo[NUMGUNS], mag[NUMGUNS], gunwait[NUMGUNS];
...
}
Alright, so our goal is to control these variables (health, armour, ammo), but first we need to find them. So there are lots of tools out there which are famous in the Windows game hacking scene. One of them is Cheat Engine which lucky for us, is also supported on macOS. This tool simplifies the game hacking process so that we don’t have to spend too much time with the building blocks such as finding memory offsets, pointers, structures, instructions which read and write to our data, etc. But I wanted a more bare bones approach with less abstraction of the process. So I decided to take the homebrew route to finding these entities in the game memory map.
I decided to utilise Frida for prototyping a quick solution for helping me search process memory and find offsets and pointers to important memory locations such as the address of the structure which stores our health. For this, I utilised the Frida Memory and Process APIs. To search and write to process memory, we need the basic primitives of reading and writing. This can easily be achieved with the following simple functions.
function readMem(addr, size) {
    return Memory.readByteArray(ptr(addr), size);
}

function writeMem(addr, data) {
    Memory.writeByteArray(ptr(addr), data);
}
We can extend this to searching memory for data of our choosing.
// searches heap chunks of `protection` permissions
// and returns chunks containing the search term as
// an array
function _scanHeap(needle, protection) {
    if (typeof protection === 'undefined')
        protection = 'rw-';
    chunks = Process.enumerateMallocRangesSync(protection);
    found = Array();
    for (var i = 0; i < chunks.length; i++) {
        t = Memory.scanSync(chunks[i]['base'], chunks[i]['size'], needle);
        if (t.length > 0)
            found.extend(t);
    }
    return found;
}

// searches for the needle in the haystack (heap chunks)
// if haystack is not provided, heap chunks of 'rw-'
// permissions are used
// returns array chunks containg the search term
function searchMem(needle, haystack) {
    if (typeof haystack === 'undefined') {
        return _scanHeap(needle);
    }
    found = Array();
    for (var i = 0; i < haystack.length; i++) {
        t = Memory.scanSync(ptr(haystack[i]['address']), haystack[i]['size'], needle);
        if (t.length > 0)
            found.extend(t);
    }
    return found;
}
To effectively search for arbitrary patterns in memory, we need to search for our needle in a preformatted way according to how the memory is stored for a certain architecture specification. In x86, data is stored in little endian format and also, a pointer is of size 4 bytes on x86. The Assault Cube release comes on in x86 (32 bit) and doesn’t offer a 64 bit version for macOS. To use the helper functions we’ve defined above, we thus need to format our queried pattern accordingly.
mem_types = {
    'u32': ('<I', 4), # unsigned int (4 bytes)
    's32': ('<i', 4), # signed int (4 bytes)
    'u64': ('<Q', 8), # unsigned long (8 bytes)
    's64': ('<q', 8), # signed long (8 bytes)
    'f'  : ('<f', 4), # float (4 bytes)
    'd'  : ('<d', 8)  # double (8 byte)
}

def format_needle(mem_type, needle):
    if mem_type == 's':
        s = needle.encode().hex()
    else:
        s = struct.pack(mem_types[mem_type][0], needle)
        s = codecs.encode(s, 'hex').decode()

    s = iter(s)
return ' '.join(i + j for i, j in zip(s, s))
We can then call the corresponding JS helper function we defined through Python bindings like so:
def search_mem(self, mem_type, needle, haystack=None):
    needle = format_needle(mem_type, needle)
    if haystack is None:
        return self.script.exports.search_mem(needle)
    return self.script.exports.search_mem(needle, haystack)
To find a memory address, such as the current ammo, we can follow a process of minimisation. We will start with some amount of ammo and search for that value with the help of our defined functions. We can then change the ammo value again by shooting some bullets and then search again for this new value but only in the subset of memory locations we found in the last search.
And similar to the write mem API, we can effortlessly do the same for modifying the ammo amount!
def write_mem(self, mem_type, addr, data):
data = format_needle(mem_type, data)
data = list(map(lambda x: int(x, 16), data.split()))
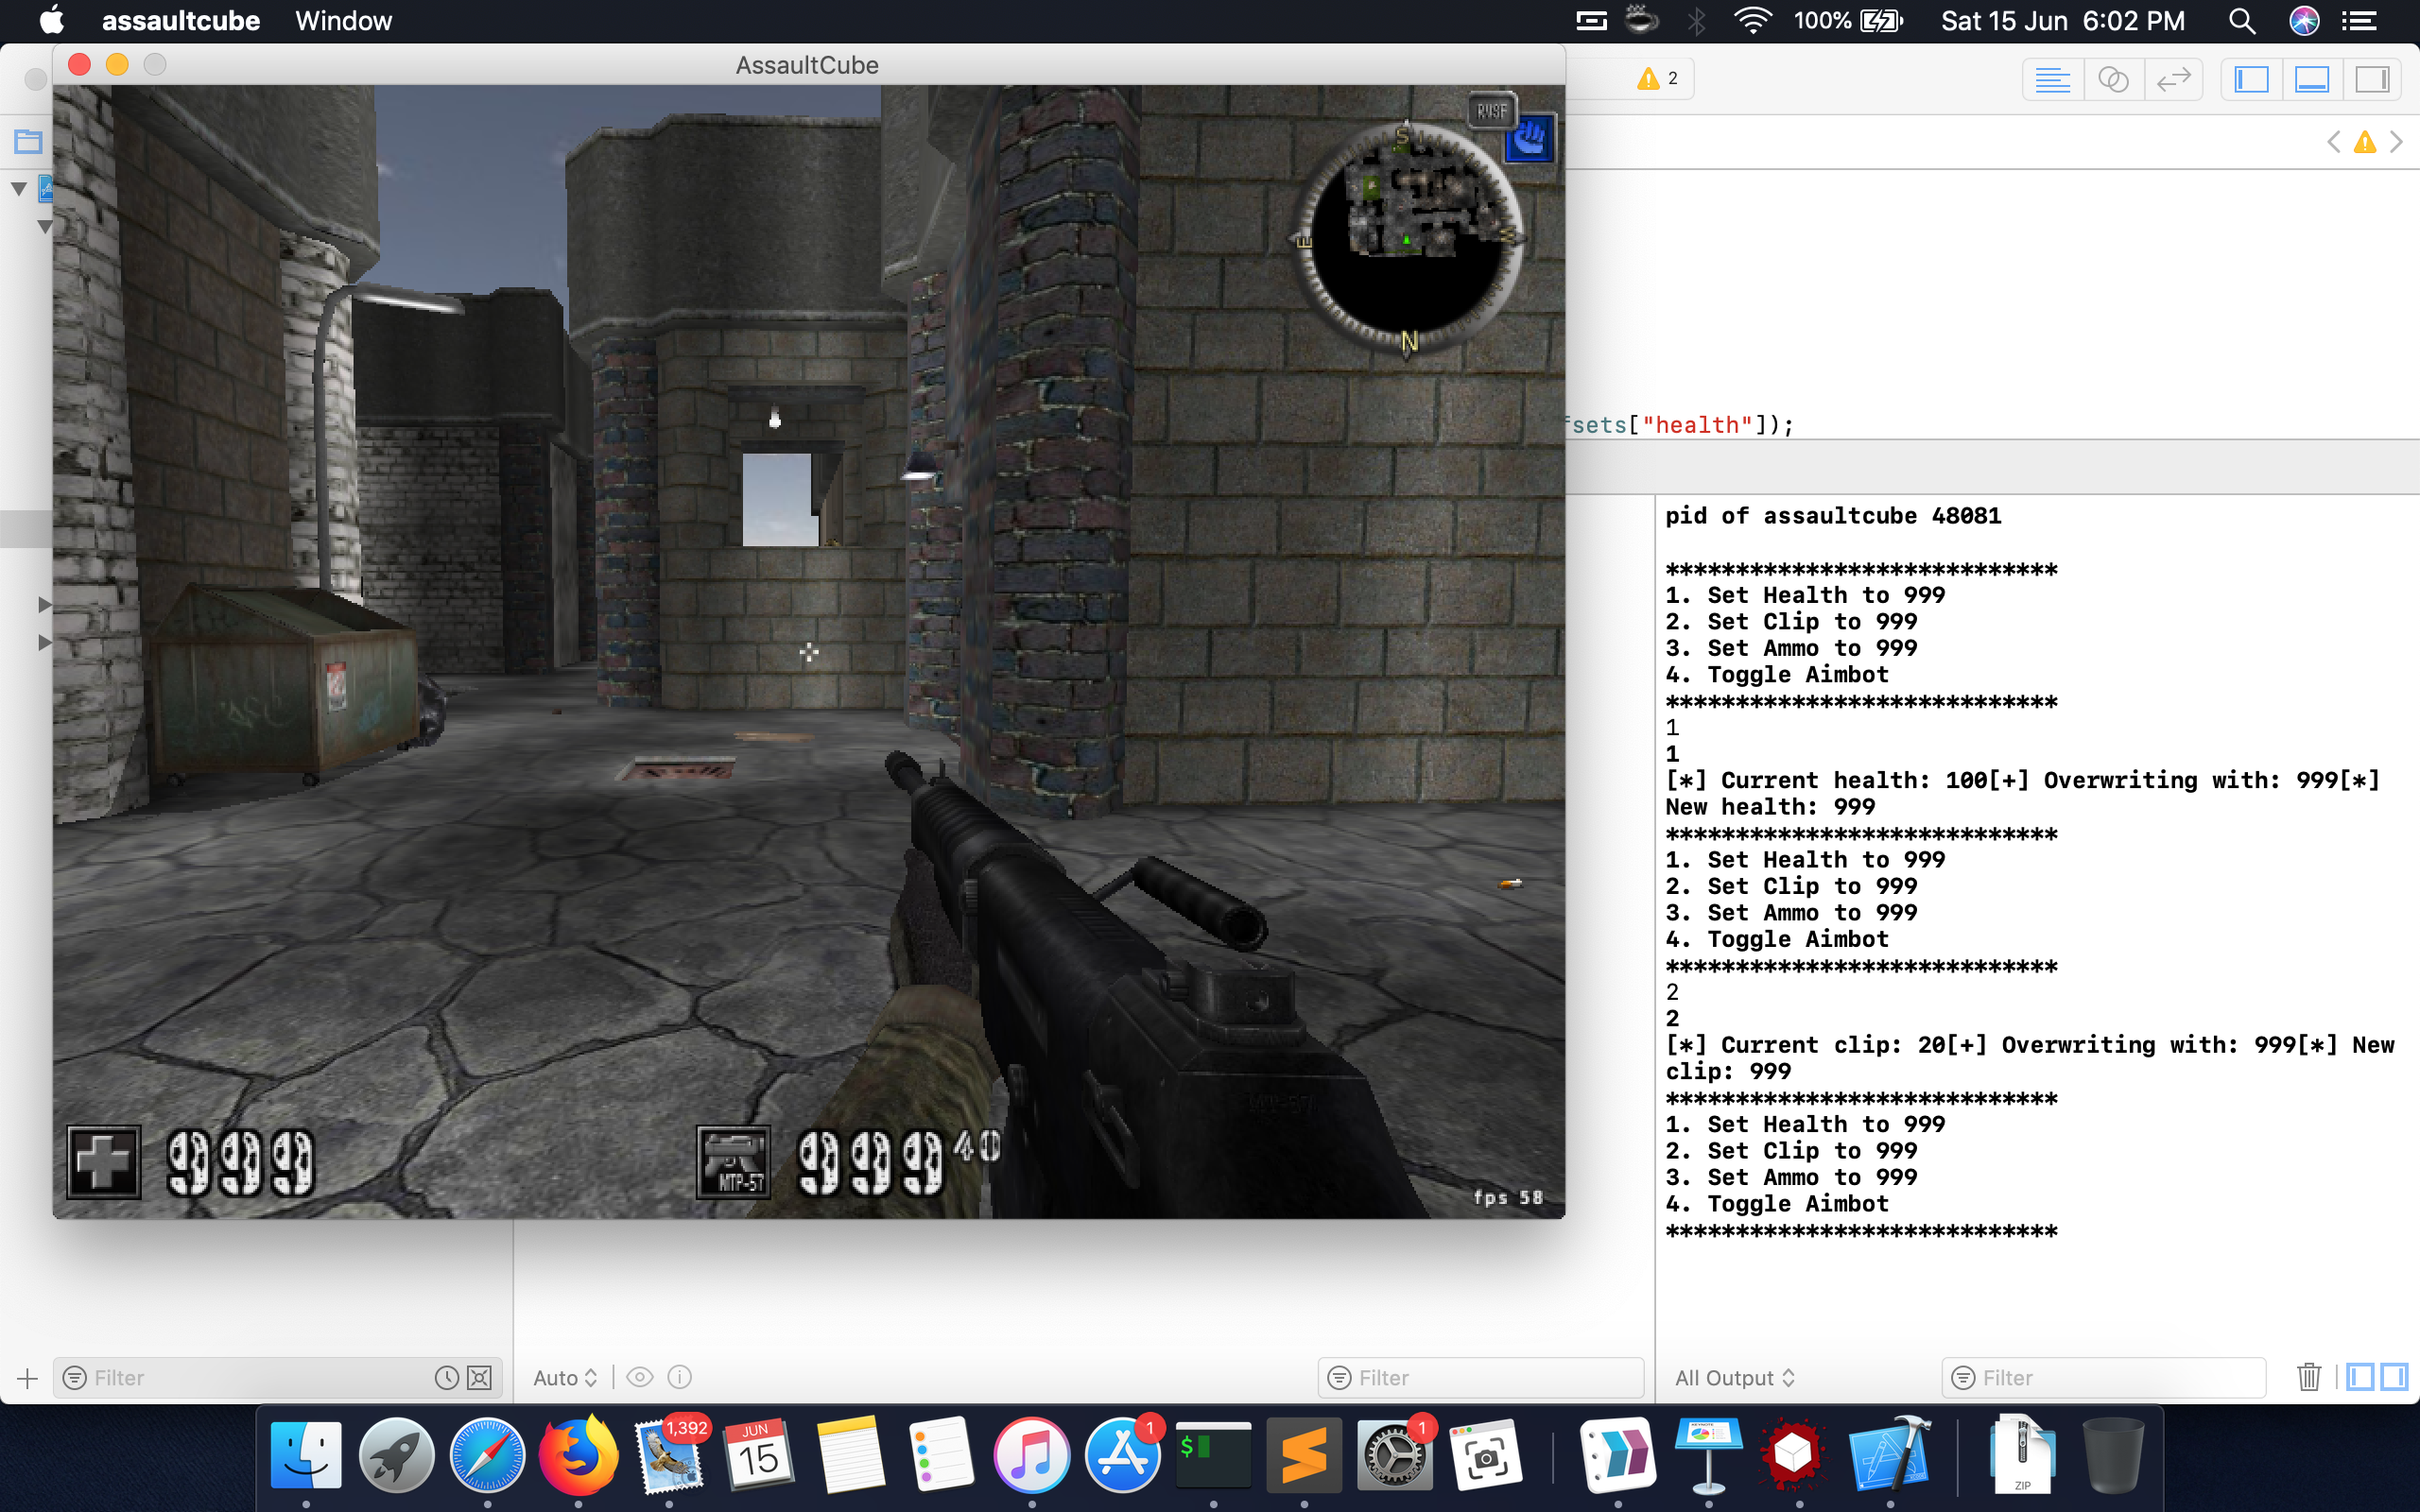
self.script.exports.write_mem(addr, data)(frida) jai@rose # ~/Documents/tmp/game/headshot/frida_trainer # master $ ipython -i scan.py
Python 3.6.5 (default, Apr 25 2018, 14:23:58)
Type 'copyright', 'credits' or 'license' for more information
IPython 6.5.0 -- An enhanced Interactive Python. Type '?' for help.
In [1]: m = Mem('assaultcube')
In [3]: l = m.search_mem('u32', 19)
In [4]: len(l)
Out[4]: 1242
In [5]: m.search_mem('u32', 18, l)
Out[5]: [{'address': '0xd9070d4', 'size': 4}, {'address': '0x2815f50', 'size': 4}]
In [7]: m.write_mem('u32', 0x2815f50, 999)This sets the number of bullets in our magazine to 999 as you can see in the picture below.

Finding Player offsets
Okay so now that we know that we can modify game memory to increase our ammo (we can do the same for health and total ammo as well), we need to find a reliable way to get this address. Since this feature has to be included as part of our trainer, we don’t want to manually search for this address every time we start a new game. We have to find a constant base address and figure out the offsets of the target memory locations we need relative to the constant base address. Even if we don’t look at the code/disassembly of the game, it is safe to assume that there has to be some location in the game memory that is used to store the player base address, probably in the __DATA section of the binary.
Frida supports an API called MemoryAccessMonitor which works similar to debugger watchpoints, but unfortunately, this is currently only supported on Windows. So to proceed, we’ll use lldb to debug the game and find the player base address.
Assuming that there’s a health variable in my player object, the corresponding assembly instructions to access the health would be adding an offset to the object base address. If we can identify and break at this instruction, we can identify the player base address. Considering something like:
struct Player {
    ...
    unsigned int health;
    ...
};
We can set a watchpoint in lldb to break at any instruction which modifies are health. This would happen when my player incurs damage, either from getting shot or from a grenade. So we’ll find our health address first using the approach mentioned above and then set a watchpoint to break at any instruction which writes to our health address.
...
(lldb) watchpoint set expression -- 0x20060F8
(lldb) watchpoint modify -c ‘*(int*)0x20060F8 != 70 # assuming 70 is current health
(lldb) c
Process 7932 resuming

Watchpoint 1 hit:
old value: 70
new value: 54
Process 7932 stopped
* thread #1, queue='com.apple.main-thread', stop reason = watchpoint 1
    frame #0: 0x0002ebe1 assaultcube`__lldb_unnamed_symbol510$$assaultcube + 737
assaultcube`__lldb_unnamed_symbol510$$assaultcube:
->  0x2ebe1 <+737>: mov    ecx, dword ptr [ebp + 0x10]
    0x2ebe4 <+740>: mov    ebx, eax
    0x2ebe6 <+742>: cmp    dword ptr [edi + 0xfcf97], esi
    0x2ebec <+748>: jne    0x2ec5a                   ; <+858>
Target 0: (assaultcube) stopped
...
(lldb) dis -s 0x36b58
assaultcube`___lldb_unnamed_symbol584$$assaultcube:
0x36b58 <+2088>: mov    dword ptr [esi + 0xf8], eax
Here esi stores our player structure and health is at an offset of 0xf8 from the base of the player struct. We can now search for a global variable which holds the pointer to our player struct. We can limit our scans to the rw- segments.
 jai@rose # ~ # vmmap `pidof assaultcube` | grep "assaultcube$"
Path:            /Applications/AssaultCube.app/Contents/gamedata/assaultcube.app/Contents/MacOS/assaultcube
Identifier:      assaultcube
__TEXT                 00001000-0011a000 [ 1124K   884K     0K     0K] r-x/rwx SM=COW          /Applications/AssaultCube.app/Contents/gamedata/assaultcube.app/Contents/MacOS/assaultcube
__LINKEDIT             0014d000-00152000 [   20K    20K     0K     0K] r--/rwx SM=COW          /Applications/AssaultCube.app/Contents/gamedata/assaultcube.app/Contents/MacOS/assaultcube
__DATA                 0011a000-0011f000 [   20K    20K    20K     0K] rw-/rwx SM=COW          /Applications/AssaultCube.app/Contents/gamedata/assaultcube.app/Contents/MacOS/assaultcube
__DATA                 0011f000-0014c000 [  180K   148K   148K     0K] rw-/rwx SM=PRV          /Applications/AssaultCube.app/Contents/gamedata/assaultcube.app/Contents/MacOS/assaultcube
__OBJC 0014c000-0014d000 [ 4K 4K 4K 0K] rw-/rwx SM=COW /Applications/AssaultCube.app/Contents/gamedata/assaultcube.app/Contents/MacOS/assaultcube(lldb) memory find -e 0x2006000 0x000000000011a000 0x000000000014d000
data found at location: 0x12b8a8So we now know that 0x12b8a8 holds the address of our player struct and this’ll remain constant throughout. Now it is trivial to find the offsets of the other variables of interest to us and start building our game trainer.
class Trainer:
    def __init__(self, pid):
        self._pid = pid
        self._player_ptr = 0x12b8a8
        self._enemy_vector_ptr = self._player_ptr + 0x4
        self._enemy_count_ptr = self._player_ptr + 0xc
        self._view_matrix_ptr = 0x133594
        # 0x133554, 0x133594, 0x1335d4, 0x133614
        self._window_width_ptr = 0x12e4ac
        self._window_height_ptr = 0x12e4b0
        self._m = scan.Mem(int(pid))
        self._player_count = self._m.read_mem('u32', self._enemy_count_ptr)
        self._offsets = {
            'health': [0xf8],
            'weapon_ammo': [0x374, 0x10, 0x0],
            'weapon_clip': [0x374, 0x14, 0x0],
            'player_name': [0x225],
            'head_vector3f': [0x4],
            'foot_vector3f': [0x34],
            'yaw': [0x40],
            'pitch': [0x44],
            'toggle_aimbot': [0x32c]
        }
self.player = Player(self._player_ptr, self._m)
Native memory read-write
Before we go ahead with some of the other hacks, I want to write about how to do this using mach_vm_* API. We’ve used Frida to read and write to memory, but Frida also abstracts away the OS specific details. For example, on Windows we would use the ReadProcessMemory and WriteProcessMemory APIs to interact with the memory of a process. Similarly, we can use mach_vm_read and mach_vm_write on macOS to do the same. You could also just attach a debugger and modify memory with that, but that is difficult to automate and slows things down quite a bit. On linux, you might use the ptrace API to achieve this.
Before we can read and write process memory, we need to obtain the corresponding task for the pid of the game. You can get this using the task_for_pid function.
This is what our Trainer class roughly looks like:
class Trainer {
private:
    pid_t pid;
    task_t task;
    Player self = NULL;
    ...

public:
    Trainer() = delete;
    Trainer(int);
    void reinit();
    float get_distance(Player p, Player q);
    std::tuple<float, float> calc_aim_angles(Player p, Player q);
    bool trace_line(Player p, Player q);
    ...
};
To get the task of the game process, we simply do:
Trainer::Trainer(int pid) {
    auto new_pid = static_cast<pid_t>(pid);
    this->pid = new_pid;
    task = task_from_pid(this->pid);
    ...
I’ve defined some wrapper functions over vm_read and vm_write which allow you to read and write arbitrary data types from a process’ memory.
Read:
template <class T>
T read_data(task_t task, uintptr_t address) {
    kern_return_t kret;
    unsigned int count;
    vm_offset_t data_ptr = 0;

    kret = vm_read(task, (vm_address_t)address, sizeof(T), &data_ptr, &count);

    if (kret != KERN_SUCCESS) {
        std::cerr << "vm_read failed" << std::endl;
        std::cerr << mach_error_string(kret) << std::endl;
        exit(kret);
    }

    T dst;
    std::memcpy((void*)&dst, (void*)data_ptr, count);
    vm_deallocate(current_task(), data_ptr, count);

    return dst;
}
Write:
template <class T>
void write_data(task_t task, uintptr_t address, T src) {
    kern_return_t kret;

    kret = vm_write(task, (vm_address_t)address, (vm_offset_t)&src, sizeof(T));

    if (kret != KERN_SUCCESS) {
        std::cerr << "vm_write failed" << std::endl;
        std::cerr << mach_error_string(kret) << std::endl;
        exit(kret);
    }
}
These functions basically allow you to modify the health and ammo of the game similar to what we had done earlier using Frida.
Aimbot
Now lets tackle some of the more fun hacks (aimbot and ESP). We’ll start with making an aimbot.
An aimbot will automatically aim at enemy players, so all we have to do is move around and press the left mouse button to kill an enemy. To achieve this, we need to calculate the yaw and pitch angles from our player to the enemy player so we can programmatically adjust our aim.
All the information we need to calculate this stuff is already present in the player structs. (The enemy player structs can also be found in game memory). In-fact, pointers to the enemy player structs are stored exactly adjacent to our player struct pointer.
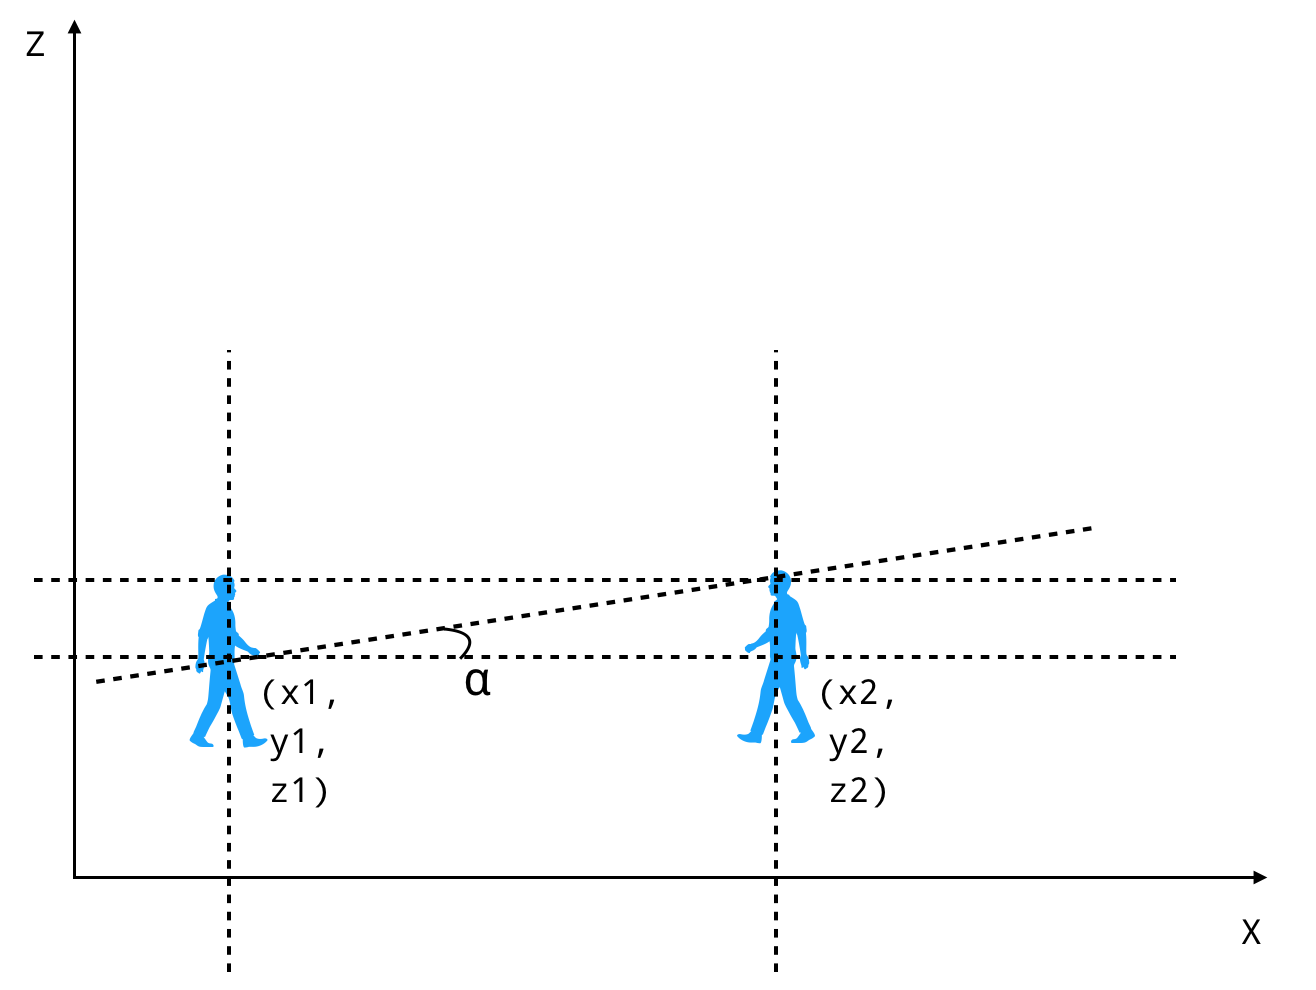
The player structure stores (x, y, z) cooridinates of the player. We can apply some basic trigonometry principles to calculate the angles at which we need to aim.
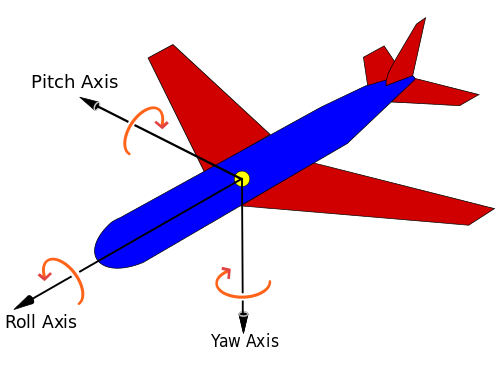
Here’s an image from https://en.wikipedia.org/wiki/Aircraft_principal_axes describing what yaw and pitch is.
So, if we have the coordinates of two players, we need to calculate alpha and beta where alpha and beta are described throught the following pitcures.
This depicts the side view of 2 players from which we’ll calculate the pitch.
This depicts the top view of 2 players from which we’ll calculate the yaw.
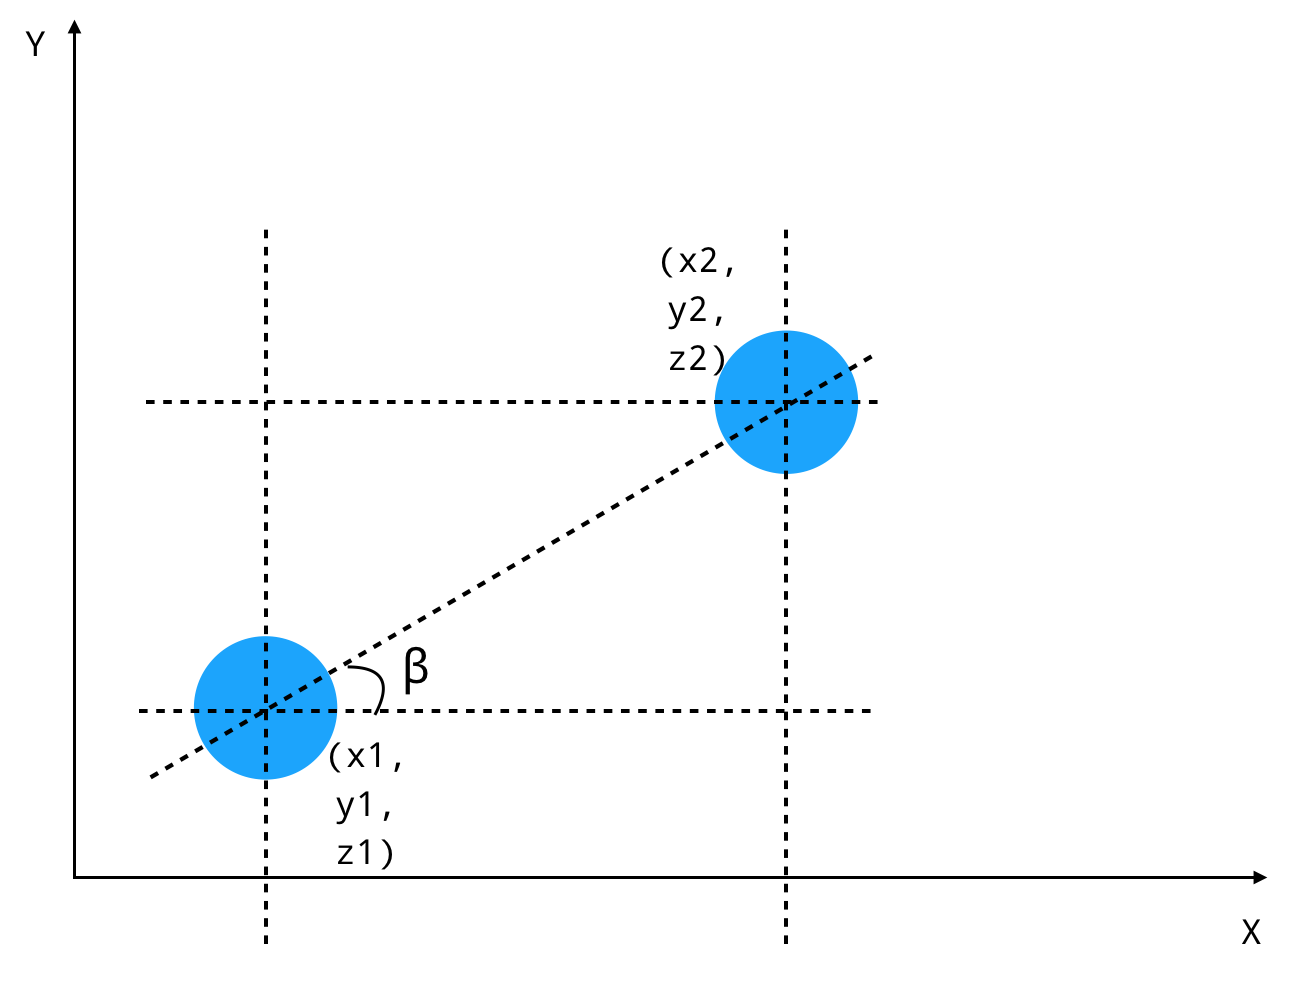
(Please excuse my ugly diagrams :p)
So now we have
pitch = arctan ((z2 - z1) / dist))
yaw = arctan ((y2 - y1) / (x2 - x1))

dist = euclidean distance = sqrt((x2 - x1)^2 + (y2 - y1)^2)
Before we go ahead and implement this, here’s a cool video in which we can see the pitch change when we move our aim up and down.
This is done using the dump_region function defined below. Basically, we’ve fed it the address of the pitch in the player struct and we’re visualising it using the curses library to see it change when we move the crosshair.
def dump_region(self, mem_type, start_addr, n_elem, hexa=True, n_elem_in_line=3):
    def curse(stdscr):
        try:
            while True:
                buf = []
                cur_addr = start_addr
                if mem_type is 'f':
                    hexa = False

                for i in range(n_elem):
                    buf.append(self.read_mem(mem_type, cur_addr))
                    cur_addr += mem_types[mem_type][1]

                cur_addr = start_addr
                stdscr.clear()
                for i in range(0, len(buf), n_elem_in_line):
                    data = buf[i:i + n_elem_in_line]
                    if hexa:
                        data = list(map(hex, data))
                    if mem_type is 'f':
                        data = list(map(lambda x: round(x, 2), data))
                    format_str = ['{:>8}'] * len(data)
                    data.extend(['-'] * (n_elem_in_line - len(data)))
                    stdscr.addstr('{} : '.format(hex(cur_addr)) + ' '.join(format_str).format(*data) + '\n')
                    cur_addr += mem_types[mem_type][1] * n_elem_in_line
                stdscr.refresh()

        except KeyboardInterrupt:
            return

    wrapper(curse)
Here’s code to calculate the angles we want to aim correctly.
std::tuple<float, float> Trainer::calc_aim_angles(Player p, Player q) {
    auto position_p = p.get_position(task, "head");
    auto position_q = q.get_position(task, "head");

    auto p_x = std::get<0>(position_p);
    auto p_y = std::get<1>(position_p);
    auto p_z = std::get<2>(position_p);

    auto q_x = std::get<0>(position_q);
    auto q_y = std::get<1>(position_q);
    auto q_z = std::get<2>(position_q);

    auto euclidean_dist = get_distance(p, q);

    auto pitch = -atan2(p_z - q_z, euclidean_dist) * 180 / M_PI;
    auto yaw = atan2(p_y - q_y, p_x - q_x) * 180 / M_PI;

    return std::make_tuple(pitch, yaw - 90);
}
We can use the return values from here and write them to the yaw and pitch members of the player struct using the wrapper functions defined above.
void Player::set_pitch(task_t task, float pitch) {
    auto pitch_addr = resolve_pointer_chain(task, addr, constants.offsets["pitch"]);
    write_data(task, pitch_addr, pitch);
}
...
void Player::set_yaw(task_t task, float yaw) {
    auto yaw_addr = resolve_pointer_chain(task, addr, constants.offsets["yaw"]);
    write_data(task, yaw_addr, yaw);
}
Here’s a video showing the aimbot in action.
If you looked closely at this video, you’ll notice that our aimbot sucks. Yes we can lock onto enemy players and shoot them with ease, but we’re still locking onto players which aren’t in our field of vision. This is really annoying because it makes it really difficult to navigate the map if you’re locked onto something which is moving around.
Finding enemies in our FOV
We need to improve this. FPS games usually implement a function which traces a line from our gun to the enemy player to check whether the line intersects with any other object on its way to the player. Basically for checking whether our bullet will hit the enemy or will it hit some object in between, like a wall.
We need to find this function and call it at will. By spending some time analysing the code and playing with the game with a debugger, you can find the traceline function in memory. Since this function is a part of the __TEXT section and the binary is a non-PIE binary, the address of the function will remain the same each time we start the game.
We can leverage the mach_vm_* API here again to aid us in calling this function as per our need. The functions of interest to us are:
kern_return_t thread_create_running(task_t parent_task, thread_state_flavor_t flavor, thread_state_t new_state, mach_msg_type_number_t new_stateCnt, thread_act_t *child_act)kern_return_t mach_vm_allocate(vm_map_t target, mach_vm_address_t *address, mach_vm_size_t size, int flags)kern_return_t mach_vm_protect(vm_map_t target_task, mach_vm_address_t address, mach_vm_size_t size, boolean_t set_maximum, vm_prot_t new_protection)
thread_create_running allows us to create and start a new thread with a state we specify. This state describes the values of the processor registers which allows us to execute arbitrary code in the context of the game process. We can set the program counter register eip on x86 to specify what we want to execute.
We’ll create 2 sections in the memory:
- A section with
r-xpermission in which we’ll store our shellcode. This will consist of code which will call thetracelinefunction - A section with
rw-permission which will be used as a fake stack
Since this is a 32-bit process, function arguments are passed on the stack.
The traceline function takes the player positions as arguments and returns a struct which contains 3 floats which contain (x, y, z) coordinates and a bool which stores whether the line collides with any object.
struct traceresult_t {
    float x;
    float y;
    float z;
    bool collided;
} traceresult;
We’ll allocate the stack and text section for our shellcode and space for our result.
// allocate memory for traceresult_t in remote process
error = vm_allocate(task, &traceresult_addr, sizeof(traceresult_t), 1);
error = vm_protect(task, traceresult_addr, sizeof(traceresult_t), 0, VM_PROT_READ | VM_PROT_WRITE);

// allocate stack
error = vm_allocate(task, &stack_addr, stack_size, 1);
error = vm_protect(task, stack_addr, stack_size, 1, VM_PROT_READ | VM_PROT_WRITE);

 // allocate .text
error = vm_allocate(task, &code_addr, code_size, 1);

// mark code segment as rwx
error = vm_protect(task, code_addr, code_size, 0, VM_PROT_READ | VM_PROT_WRITE);

char *shellcode = prepare_shellcode(code_addr);
vm_write(task, code_addr, (vm_offset_t)shellcode, code_size);
error = vm_protect(task, code_addr, code_size, 0, VM_PROT_READ | VM_PROT_EXECUTE);
The traceline function takes 9 parameters, something like the following:
void traceline(float x1,
               float y1,
               float z1,
               float x2,
               float y2,
               float z2,
               uintptr_t player_address,
               uint32_t something,
               traceresult_t *t)
We’ll copy over the parameters onto the remote stack.
// write function parameters to our constructed fake stack
int i = 0;
auto temp = pack_int(std::get<0>(position_p)); // p.x
memcpy(fake_stack + i, temp.c_str(), temp.length());
i += temp.length();
temp = pack_int(std::get<1>(position_p)); // p.y
memcpy(fake_stack + i, temp.c_str(), temp.length());
i += temp.length();
temp = pack_int(std::get<2>(position_p)); // p.z
memcpy(fake_stack + i, temp.c_str(), temp.length());
i += temp.length();
temp = pack_int(std::get<0>(position_q)); // q.x
memcpy(fake_stack + i, temp.c_str(), temp.length());
i += temp.length();
temp = pack_int(std::get<1>(position_q)); // q.y
memcpy(fake_stack + i, temp.c_str(), temp.length());
i += temp.length();
temp = pack_int(std::get<2>(position_q)); // q.z
memcpy(fake_stack + i, temp.c_str(), temp.length());
i += temp.length();
temp = pack_int(p.addr);
memcpy(fake_stack + i, temp.c_str(), temp.length());
i += temp.length();
temp = pack_int(0);
memcpy(fake_stack + i, temp.c_str(), temp.length());
i += temp.length();
temp = pack_int(traceresult_addr);
memcpy(fake_stack + i, temp.c_str(), temp.length());
i += temp.length();

// write fake stack to remote process
error = vm_write(task, real_stack_addr, (vm_offset_t)fake_stack, stack_space);
We’ll finally setup the register context and start the remote thread in the game process. We’ll wait for a few miliseconds for the function call to complete, and we’ll retrieve the return value from the remote process.
i386_thread_state_t remote_thread_state;
memset(&remote_thread_state, 0, sizeof(remote_thread_state));

remote_thread_state.__eip = static_cast<uint32_t>(code_addr);
remote_thread_state.__esp = static_cast<uint32_t>(real_stack_addr);
remote_thread_state.__ebp = static_cast<uint32_t>(real_stack_addr);

thread_act_t remote_thread;
error = thread_create_running(task, i386_THREAD_STATE, (thread_state_t)&remote_thread_state, i386_THREAD_STATE_COUNT, &remote_thread);
std::cerr << mach_error_string((kern_return_t)error) << std::endl;

std::this_thread::sleep_for(std::chrono::milliseconds(5));
auto collided = read_data<bool>(task, traceresult_addr + sizeof(float) * 3);
thread_terminate(remote_thread);
return (collided == 0);
One important function we skipped is the prepare_shellcode function which is used above. This is the function which actually returns shellcode which will run in the remote process. Here we actually call the traceline function which takes arguments from the fake stack we had setup above.
char* Trainer::prepare_shellcode(uintptr_t code_addr) {
    char *shellcode = (char*)malloc(1024);
    memset(shellcode, 0, 1024);
    unsigned int i = 0;

    memcpy(shellcode + i, "\xb8\x70\x2a\x01\x00", 5); // mov eax, 0x12a70
    i += 5;

    memcpy(shellcode + i, "\xff\xd0", 2); // call eax
    i += 2;


    memcpy(shellcode + i, "\x90\x90", 2); // nop, nop
    i += 2;

    memcpy(shellcode + i, "\xb8", 2); // mov eax, code + i - 2
    i += 1;

    auto temp = pack_int(code_addr + i - 2);
    memcpy(shellcode + i, temp.c_str(), temp.length());
    i += temp.length();

    memcpy(shellcode + i, "\xff\xe0", 2); // jmp eax
    i += 2;

    return shellcode;
}
This video shows what the traceline function looks like by inspecting it in the remote process using lldb.
So if we combine our aimbot with this function, it will give us a reliable aimbot which aims only at enemies which we can actually shoot at.
Another way to achieve calling traceline is by using Frida. Frida provides a handy API called X86Writer which allows us to write arbitrary code to a process. We can also use the NativeFunction API to call traceline in the game process.
Here’s an excerpt from the trainer which uses the Frida to call traceline.
Memory.patchCode(traceLineAsm, Process.pageSize, function(code) {
    x86W = new X86Writer(code, { pc: traceLineAsm });
    x86W.putPushReg('xbp');
    x86W.putMovRegReg('xbp', 'xsp');
    x86W.putSubRegImm('xsp', 0x50);
    // x86W.putPushU32(0);
    x86W.putPushU32(traceresult.toInt32());
    x86W.putPushU32(0);
    x86W.putPushU32(pTracerPtr);
    x86W.putPushU32(to_z);
    x86W.putPushU32(to_y);
    x86W.putPushU32(to_x);
    x86W.putPushU32(from_z);
    x86W.putPushU32(from_y);
    x86W.putPushU32(from_x);
    x86W.putCallAddress(ptr(0x12a70));
    x86W.putAddRegImm('xsp', 0x50);
    x86W.putLeave();
    x86W.putRet();
    x86W.flush();
});
traceLineNative = new NativeFunction(traceLineAsm, 'void', []);
traceLineNative();
This is what the final aimbot looks like.
Seeing through walls!
Since this post is getting pretty long now, I’ll skim through the implementation of the ESP.

This is the crux of what ESP allows you to do :p
Jokes apart, Assault Cube uses OpenGL for rendering. Now similar to how we had called the traceline function in the context of the game process, we can also call OpenGL functions using the methods described above. If we don’t want to use OpenGL, we can use Apple’s Cocoa API for drawing to the screen as well (though that didn’t work out well for me because I’m sure I didn’t do it the right way. Take a look at the source code if you want to have a look at that, I won’t be describing that here).
This is what a generic rendering pipeline looks like
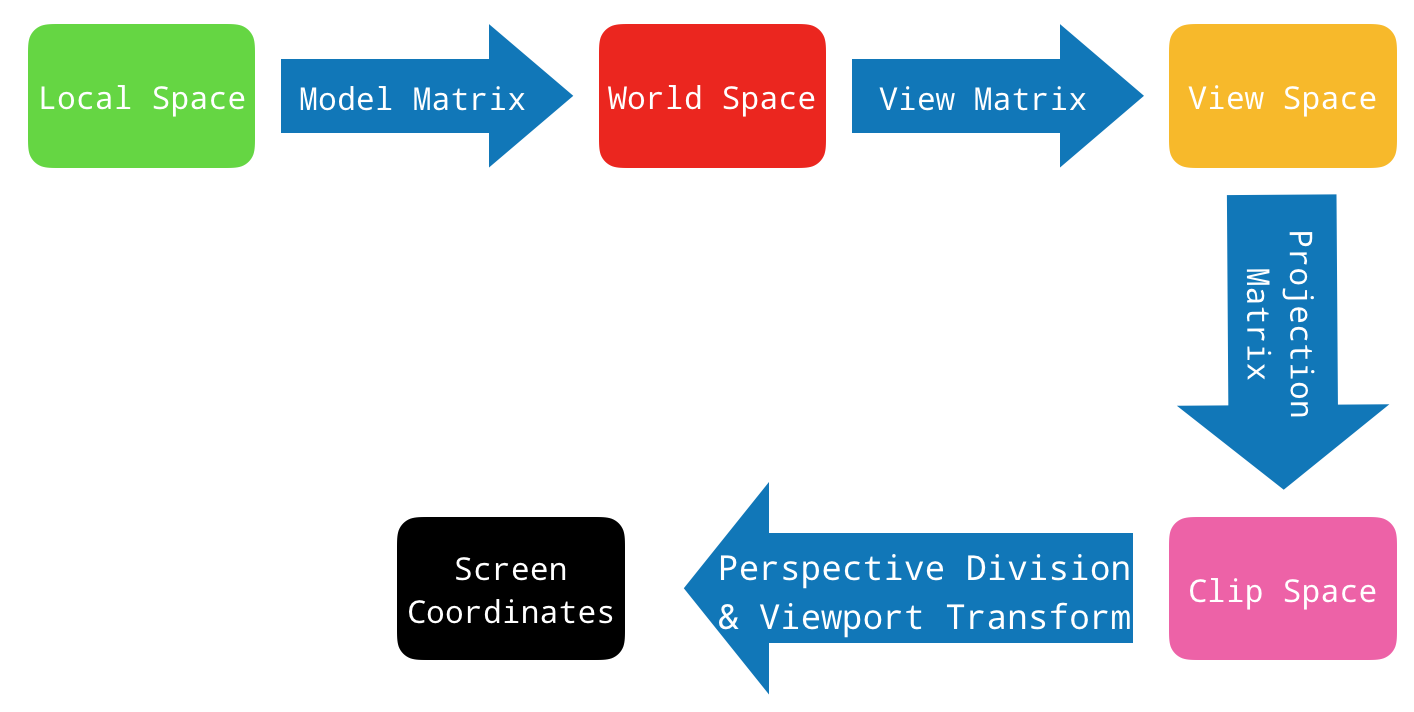
These details are already present in the game process. The hard part is finding them in memory. We want to find the Model View Projection matrix in memory. If you’ve found that, then you only need to do some matrix multiplication to get screen coordinates, and call some OpenGL functions to display anything to the screen.
More on finding the MVP matrix is described in this amazing Guided Hacking thread.
Here’s a video of what the MVP matrix looks like when you move your crosshairs around.
Since we know the (x, y, z) coordinates of all the players in the game, we want to draw bounding boxes around them on the screen. This will make it easier for us to spot them, even if they’re behind a wall. We’ll create NativeFunctions for the OpenGL functions we would like to use with the help of Frida.
// stuff for drawing with opengl
glColorAddr = Module.findExportByName('OpenGL', 'glColor3f');
glBeginAddr = Module.findExportByName('OpenGL', 'glBegin');
glVertex2fAddr = Module.findExportByName('OpenGL', 'glVertex2f');
glEndAddr = Module.findExportByName('OpenGL', 'glEnd');
glMatrixModeAddr = Module.findExportByName('OpenGL', 'glMatrixMode');
glLoadIdentityAddr = Module.findExportByName('OpenGL', 'glLoadIdentity');
glOrthoAddr = Module.findExportByName('OpenGL', 'glOrtho');
glViewportAddr = Module.findExportByName('OpenGL', 'glViewport');

glBegin = new NativeFunction(glBeginAddr, 'void', ['int']);
glColor3f = new NativeFunction(glColorAddr, 'void', ['float', 'float', 'float']);
glVertex2f = new NativeFunction(glVertex2fAddr, 'void', ['float', 'float']);
glEnd = new NativeFunction(glEndAddr, 'void', []);
glMatrixMode = new NativeFunction(glMatrixModeAddr, 'void', ['int']);
glLoadIdentity = new NativeFunction(glLoadIdentityAddr, 'void', []);
glOrtho = new NativeFunction(glOrthoAddr, 'void', ['double', 'double', 'double', 'double', 'double', 'double']);
glViewport = new NativeFunction(glViewportAddr, 'void', ['int', 'int', 'int', 'int']);
We can read the actual matrix from game memory with the following function
def _read_view_matrix(self):
    # read 4*4 matrix
    addr = self._view_matrix_ptr
    data = ''
    for i in range(1, 17):
        data += str(self._m.read_mem('f', addr))
        data += ' '
        if i % 4 == 0:
            data += ';'
        addr += self._m.ptr_size
    data = data.strip(';')
    return np.matrix(data)
To calculate the coordinates we want to pass to the OpenGL API, we need to multiply the player coordinates with the matrix we read using the _read_view_matrix function above. We take care of this in the object_to_screen function.
def object_to_screen(self, player):
    # read mvp matrix (model view projection) to convert from
    # object to clip coordinates
    view_matrix = self._read_view_matrix().transpose()
    vec3_f = player.get_position('foot') + (1,)
    vec3_h = player.get_position('head') + (1,)
    vec3_f = np.matrix(vec3_f).transpose()
    vec3_h = np.matrix(vec3_h).transpose()
    pos_f = np.dot(view_matrix, vec3_f)
    pos_h = np.dot(view_matrix, vec3_h)
    w_f = pos_f.item(-1)
    w_h = pos_h.item(-1)

    # convert to normalized device coordinates
    ndc_f = pos_f / pos_f.item(-1)
    ndc_h = pos_h / pos_h.item(-1)

    cam_x, cam_y = map(lambda x: x / 2, self._get_window_dims())

    # convert to onscreen coordinates
    x_f = cam_x * ndc_f.item(0) + cam_x
    y_f = cam_y - cam_y * ndc_f.item(1)
    x_h = cam_x * ndc_h.item(0) + cam_x
    y_h = cam_y - cam_y * ndc_h.item(1)

    return (x_f, y_f), (x_h, y_h), (w_f > 0.1) and (w_h > 0.1)
We can finally display the bounding boxes by calling the OpenGL functions. I seem to be doing something wrong though because in the final implementation, I see that the bounding boxes are flickering and they are slightly slow. If you find out what’s wrong please file an issue or submit a pull request to the github project here.
The function which does this is
function drawBBox(x1, y1, x2, y2) {
    glColor3f(1.0, 0.0, 0.0);
    glViewport(0, 0, 800, 600);
    glMatrixMode(0x1701); // 0x1701 corresponds to GL_PROJECTION
    glLoadIdentity();
    glOrtho(0, 800, 600, 0, 0, 1);
    glBegin(2);
    glVertex2f(x1, y1);
    glVertex2f(x2, y1);
    glVertex2f(x2, y2);
    glVertex2f(x1, y2);
    glEnd();
}
The final implementation of the ESP is show here.
Wrapping up
Phew, that was a pretty long post which covered some topics to help you get started with game hacking on macOS. This is certainly not a comprehensive article about game hacking and I possibly may have done things in a very dumb way. Please correct me if I’m wrong. There might be errors in the code above and if you can improve it, please file an issue or submit a PR to the git project at https://github.com/jaiverma/headshot.
I urge you to try this trainer out and improve upon it. The aimbot is extremely jerky and a lot of enhancements can be make. Try patching the recoil function so that the aimbot is even more accurate. I also haven’t added functionality to distinguish between players on my team vs players on the enemy team. This trainer currently doesn’t stand a chance to go undetected by any of the anti-cheat solutions. Try to improve this so that it can bypass anti-cheat!
Alright that’s enough from me. I hope you enjoyed the post!